Wednesday 29 April 2020

Accessibility : Adding custom actions

In previous post , the introduction of custom accessibility actions/events was explained . But how it will be implemented ?, will cover it here.

Custom actions help the accessibility users to get all the clicks at one place. It provides a clear picture of the events and actions  of the focused view to the user. Since it is related to events and actions of one view only so all the actions will appear under Local Context Menu .


To understand the implementation , with an example , there is one list view , showing the employee list data , and grouping has already done for each list-view row (Please refer : this post) .

Now here one delete button has also been added, then in this case , there are 2 click listeners exist for each and every list-view row, that are :

  • Employee Details  click
  • Delete click


So here the problem is when the talkback is ON due to grouping of view-group , that delete button will not get focused separately , as it is the child of that view-group (list-view row).
To solve this problem , custom actions can be added. As there are 2 click listeners added , so two custom accessibility actions will be added :
  • Employee Details Action
  • Delete Action
In Adapter class :

setAccessibilityActions(holder.layoutParent)

Function body :
private fun setAccessibilityActions(view : View) {
       ViewCompat.setAccessibilityDelegate(view , object : AccessibilityDelegateCompat() {
           override fun onInitializeAccessibilityNodeInfo(
               host: View,
               info: AccessibilityNodeInfoCompat
           ) {
               super.onInitializeAccessibilityNodeInfo(host, info)
               info.addAction(AccessibilityNodeInfoCompat.AccessibilityActionCompat(R.id.layoutParent,
                   "Employee Details"))
               info.addAction(AccessibilityNodeInfoCompat.AccessibilityActionCompat(R.id.imageView,
                   "Delete"))

           }
           override fun performAccessibilityAction(
               host: View?,
               action: Int,
               args: Bundle?
           ): Boolean {
               super.performAccessibilityAction(host, action, args)
               if (action == R.id.layoutParent) {
                  Toast.makeText(context , "Employee Detail clicked!" , Toast.LENGTH_LONG).show()
               }
               if (action == R.id.imageView) {
                   Toast.makeText(context , "Delete clicked!" , Toast.LENGTH_LONG).show()
               }
               return true
           }
       })
    }

In this , two actions have been added in , onInitializeAccessibilityNodeInfo , which is used to add custom actions/events for the view.

Similarly , performAccessibilityAction , is overridden to perform the action clicks.

Here one thing is noticeable that actions are added in : info. addAction
(AccessibilityNodeInfoCompat.AccessibilityActionCompat(R.id.layoutParent, "Employee Details"))


. In AccessibilityNodeInfoCompat.AccessibilityActionCompat(R.id.layoutParent, "Employee Details") ,


  • The first argument is passed as actionId , which must be unique for each and every action which are added here. On the basis of this actionId , action will perform in performAccessibilityAction
  • In second argument , string is passed, which is the action label , which will appear under local context menu. 
Note : These changes will work only when the accessibility service is enabled. 

Here are the screenshots after adding the custom accessibility actions :


Accessibility : Introduction of custom views

While adding the grouping of views into a view-group , what if there are more than one click-lisnters added on views , how clicks are handled in accessibility grouping?

This can be done with the help of AccessibilityDelegateCompat , which is the part of accessibility api.
This class is helpful for adding the actions and events on any view. Actions will be listed under Local Context Menu and events will announce after the content announcement , like double tap to activate or double tap and hold to long press etc.

For example :

  • If it is required to add anything on double tap when talkback is on , then it will add in event.
  • when it is required to add any custom action like : detail or delete etc. then it will add in actions.
Note
  • All the events for that view will announce after the content announcement
  • All the action will appear under local context menu 
  • All the action names , should covey the exact meaning of that action , not like click here 
As per developer.android.com there are many methods defined , which can be overridden :

 dispatchPopulateAccessibilityEvent : Dispatches an AccessibilityEvent to the host view first and then to its children for adding their text content to the event.

 onInitializeAccessibilityEvent : Initializes an AccessibilityEvent with information about the host view which is the event source.

onInitializeAccessibilityNodeInfo : Initializes an AccessibilityNodeInfoCompat with information about the host view.

onPopulateAccessibilityEvent : Gives a chance to the host View to populate the accessibility event with its text content

onRequestSendAccessibilityEvent : Called when a child of the host view has requested sending an AccessibilityEvent and gives an opportunity to the parent (the host) to add the event.

sendAccessibilityEvent
: Sends an accessibility event of the given type. If accessibility is not enabled this method has no effect.

sendAccessibilityEventUnchecked : Sends an accessibility event. This method behaves exactly as sendAccessibilityEvent(View, int) but takes as an argument an
 empty AccessibilityEvent and does not perform a check whether accessibility is enabled.

getAccessibilityNodeProvider : Gets the provider for managing a virtual view hierarchy rooted at this View and reported to android.accessibilityservice.AccessibilityService
that explore the window content.

performAccessibilityAction : Performs the specified accessibility action on the view.


Tuesday 28 April 2020

Accessibility : Links

If one textview contains many links , that can be handled correctly using local context menu . Local context menu has already been covered in this post 

There are some specific rules , which should follow for links :

  • Links should have appropriate meaningful link text , not "click here"
  • All the links which are present in textview , should be listed in local context menu -> under Links category . 
  • Announcement for opening the local context menu should be correct like : "Links available , Swipe up and right to view"
Here are few screenshots , for the correct behaviour of links with accessibility : 


Correct Announcement of actions to open the list of links 
In this textview , 2 clickable links are added that are : SignUp ! & Sign In here!
So both should be listed under local context menu . 


Local Context Menu


Clickable Links under Local Context Menu


Accessibility : RecyclerView with grouping

Grouping in accessibility , means that , to add focus on parent layout , and no child layout will get the focus separately .

Traversing the child elements , one by another ,increases the steps , and also visually -impaired persons may face difficulty to understand the whole view-group , so to reduce these issues , grouping can be done.

RecyclerView , is a good example to understand the grouping scenario.

EmployeeData is showing in RecyclerView , having 3 textviews .When the grouping was not done , talkback will traverse each and every textview , like this :

Recycler View before grouping

  • To add grouping , all the child elements need to set android:importantForAccessibility="no" which will hide the child elements from talkback .
  • And add android:importantForAccessibility="yes" to container layout of  row_item , which will set focus to the container layout (ViewGroup) .
  • Also add appropriate content description to container layout .

<androidx.constraintlayout.widget.ConstraintLayout
    android:importantForAccessibility="yes"
    android:id="@+id/layoutParent">

    <ImageView
        android:id="@+id/image_emp"
        android:importantForAccessibility="no"/>

    <TextView
        android:id="@+id/textEmployeeName"
        android:importantForAccessibility="no"/>

    <TextView
        android:id="@+id/textEmployeeId"
        android:importantForAccessibility="no"
       />

    <TextView
        android:id="@+id/textJoining"
        android:importantForAccessibility="no"
        />
</androidx.constraintlayout.widget.ConstraintLayout>

And in adapter class :

textEmployeeName.text = "Employee Name : ${employee.empName}"
textEmployeeId.text = "Employee ID: ${employee.empId}"
textJoining.text = "Joining Date:  ${employee.empJoiningDate }"

layoutParent.contentDescription = textEmployeeName.text.toString()+" " +
                    textEmployeeId.text.toString()+" "+
                    textJoining.text.toString()+" "

Here in adapter class all the 3 textviews' text have been appended and set content description of  layoutParent  , which will look like this :


RecyclerView after grouping


Accessibility : Checkbox

Same as switches , checkbox should also covey all the information once get focused :

As per accessibility guidelines , checkbox should announce its State, its title , and action .

For Example  :

There are 2 example , 1 is incorrect accessibility  behaviour  and another one is correct accessibility behaviour :

Incorrect checkbox accessibility behaviour :

Incorrect checkbox accessibility behaviour 

Incorrect checkbox accessibility behaviour 


Correct checkbox accessibility behaviour :
Correct checkbox accessibility behaviour


  • Checkbox with Grouping :

For grouping of checkboxes , each and every checkbox of that group should convey the information of it's group title as well , like : 
<Group_name> 
     < check_box1 />
     < check_box2 />  
</Group_name>

So check_box1 will announce like :  <State>  <Check box title +  Group title>  <Action>


For Example :

 <TextView
        android:id="@+id/textView"
        android:text="Preferred technical skills"/>

    <CheckBox
        android:id="@+id/check1"
        android:text="Java"
        android:contentDescription="Java , Preferred technical skills" />

    <CheckBox
        android:id="@+id/check2"
        android:text="Android"
        android:contentDescription="Android , Preferred technical skills" />

    <CheckBox
        android:id="@+id/check3"
        android:text="React Native"
        android:contentDescription="React Native , Preferred technical skills" 


Accessibility : Switches

As per the accessibility guidelines  , switches should implement with text , and with talkback it would get focused and announced altogether .

For Example :

 <Switch
        android:id="@+id/switch1"
        android:text="Switch with text"/>

    <LinearLayout
        android:orientation="horizontal">

        <TextView
            android:id="@+id/textView"
            android:text="Switch Without Text"/>
        <Switch
            android:id="@+id/switch2"/>

    </LinearLayout>

Screenshots :

Below is incorrect behaviour as per accessibility guidelines :

   
Incorrect
Incorrect 


Below example is correct behaviour as per accessibility guidelines :

Correct


Accessibility : TextView & ImageView

TextView :

<Element Text> <Element Action(if added)>

  • Minimum text size must be 14sp
  • 48 dp is the recommended touch target size for elements according to Google (height and width, with an 8 dp margin around the element).

 This is not mandatory to set contentDescription here , if some thing is required to announce , which is different from the mentioned in text string , so in that case contentDescription should be added , take a look :

Case -I
  <TextView
        android:text="Hello World!"
        android:contentDescription="This is Accessibility demo!"
       />

In this case , it will only announce : "This is Accessibility demo!"
If contentDescription is not mentioned : "Hello World!"


Case -II

<TextView
        android:text="This is demo!"
        android:clickable="true"
        />

In this case , it will only announce : "This is demo! , double tap to activate"

Here , double tap to activate , will also announced because clickable="true" has been added.


In case of ImageView :

It is mandatory to mention the content description , for imageview ,  it should be the well-descriptive  and convey the correct information of that image.

If in any imageview , content description is not added , it will show the fail result , in accessibility scanner /axe tool .

So if in any imageview , it is not required to announce anything , so in that content description can set it to "@null"

Here is an example :

 <ImageView
        android:id="@+id/imageView3"
        android:contentDescription="@null"
        app:srcCompat="@mipmap/ic_launcher" />

    <ImageView
        android:id="@+id/imageView2"
        android:contentDescription="my profile"
        app:srcCompat="@mipmap/ic_launcher" />

Here we can see that , in imageView2 ,  the my profile description has been added , but in imageView3 , it will not announce anything as contentDescription is set to @null . 


Accessibility :Button

Button :  To announce the button , talkback will announce :

There are many reasons which should follow :
  • content Description should add only when it is required that the announcement is differ from button text 
  • Button (Element name) string should not added in content description string, like :
android:contentDescription="Submit Button"
This is not good example.

  • Similarly  “Double Tap to activate” (Element Action) string should not added in content description string, like :

 android:contentDescription="Submit double tap to activate"

This is not good example.

  • Also , if button’s state like : enable/disable it should also not added in content description string like: 
 android:contentDescription="Submit disabled"

This is also not good example.

Here is the example of 2 types of buttons , in that one it in disabled state :


In this demo ,there is no extra announcement has been added, it is announcing by default.

Accessibility : Global & Local Context Menus

Both Context Menus (https://support.google.com/accessibility/android/answer/6007066?hl=en)
are playing very important part in accessibility .
These menus helps to find the settings , actions & controls for that screen / view.

Accessibility Context Menu can be represent mainly in 2 ways :

  1. Listed view(Showing in post)
  2. Circular view (This will show all the options in circular form)


As mentioned in title , there are 2 types of these context menus :

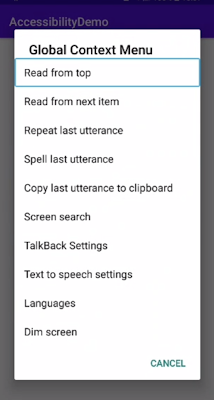
Global Context Menu :
This menu is mainly related to the whole screen and work everywhere . There are following commands which are added in Global Context Menu :


Gesture to open the global context menu  : Swipe down then right  (which can be changed in talkback settings)


Local Context Menu :
This menu is mainly related to the focused item. It contains all the commands /settings/actions/links related to that focused item .
If any custom action , which are needed to added for that view for accessibility , should be added here only.

There are following commands which are added in Local Context Menu :


Gesture to open the local context menu  : Swipe up then right  (which can be changed in talkback settings)


Accessibility : Designing accessible components

There are following checklists for designing  the android app:

  • Touch target should be minimum 46dp
  • TextSize should be minimum 14sp
  • The application correctly responds to the Huge font size option.
  • Ghost Element : means that element which is not visible should not be focusable at that time.
  • ImageView should have a well-defined description under contentDescription
  • All interactive content must be controllable by the user (pausing a carousel, adding an accessible button to exit full-screen mode, etc.).
  • Interactive elements must have the state_focused defined and must be easily distinguishable when having the focus , which is helpful for external keyboard support.
  • There should be the logical reader order , like from left to right , top to bottom etc. there are some cases where these order Talkback may not decide the correct order , then in that case , order can be set in xml file/ in kotlin file , which is explained in this post.
  • The element which is changing dynamically , should be announced when any change occur . Briefly described in this post.


Accessibility : Useful Accessibility Functions

When Talkback is announcing the element , it must be focused that announcing element .

  • ImportantForAccessibility :
In android , the elements can also hide from accessibility :

Auto (0): This is the default, it is the system that decides.
Yes (1): The view is important for accessibility. For example, it can receive the TalkBack focus.
No (2): The view is not important for accessibility. It does not trigger accessibility events and is therefore ignored by accessibility services such as TalkBack.
NoHideDescendants (4): The view is not important for accessibility, nor are its children views.

 <TextView
        android:id="@+id/textShow"
        android:importantForAccessibility="yes"
        android:text="Title" />

    <TextView
        android:id="@+id/textHide"
        android:importantForAccessibility="no"
        android:text="Should Not Announce" />

    <TextView
        android:id="@+id/textDesc"
        android:importantForAccessibility="yes"
        android:text="Description" />

Here , @+id/textHide , will not get focused & not announced . Remaining two will announce.

For more info :
https://developer.android.com/reference/android/view/View#attr_android:importantForAccessibility


  • LabelFor :
Specifies the id of a view for which this view serves as a label for accessibility purposes. For example, a TextView before an EditText in the UI usually specifies what information is contained in the EditText. Hence, the TextView is a label for the EditText.

    <TextView
        android:id="@+id/textName"
        android:text="Enter Name"
        android:labelFor="@+id/editTextTextPersonName"
       />

    <EditText
        android:id="@+id/editTextTextPersonName"
        android:inputType="textPersonName" />


  • Reordering Elements :
This helps to set a logical focus order of the elements inside a view-group , there are 2 main attributes which helps to set the order : 

  1. android:accessibilityTraversalBefore on a view to specify what item this should come before .
  2. android:accessibilityTraversalAfter on a view to specify what item this should come after .


  <TextView
        android:id="@+id/textShow"
        android:text="Title" />

    <TextView
        android:id="@+id/textLast"
        android:text="Should Announce in last"
        android:accessibilityTraversalAfter="@id/textDesc"/>

    <TextView
        android:id="@+id/textDesc"
        android:text="Description"
        android:accessibilityTraversalAfter="@id/textShow"/>

Demo :


  • Changing Content :
When any view's content is subject to change dynamically and should in this case notify the Accessibility API which can be done by setAccessibilityLiveRegion method that takes a mode parameter for the live region. There are 3 modes:

ACCESSIBILITY_LIVE_REGION_NONE: This is the default for most views , not live region.

ACCESSIBILITY_LIVE_REGION_POLITE: When a change occurs, talkback are triggered by the changes. they have lower priority than system by default announcements.

ACCESSIBILITY_LIVE_REGION_ASSERTIVE: When a change occurs,  are triggered by the changes, having the highest priority and are immediately announce.
For example : Any list is having filter button , and  data of the list is changing by applying the filters on it , in that case , this attribute can be useful , because list is changing again and again.


  • AnnouncementForAccessibility : 
When announceForAccessibility() is called, Android will give an audible announcement for those using a screen reader, and do nothing if an accessibility tool is not in use. You can use this to inform the user that the value has been incremented.

amount.announceForAccessibility(getString(R.string.count))


These are many more attributes , which can be used for accessibility implementation.

Sunday 26 April 2020

Accessibility : TalkBack

Talkback , is screen-reader which is used to announce the text mentioned on screen. In most of the devices it is installed , but if it is not installed , user can install it from Google Play :

TalkBack : https://play.google.com/store/apps/details?id=com.google.android.marvin.talkback

It also helps to read sequentially for whole screen. In Talkback there are many gestures which are used to navigate , read , get the actions etc.


To get started using TalkBack:
  1. Navigate to Settings (Phone Settings)
  2. Under System, select Accessibility
  3. Under Services, select TalkBack
  4. Turn the switch on to start the TalkBack screen reader
User can also manage the speech rate and pitch of talkback under, Accessibility > Text-to-speech settings and increase or decrease the Speech rate.

Also there are many more settings options available , under Talkback Settings  , like display output speech , item description order , announce password etc. 

There are many gestures defined in Talkback : 


Here it is almost all the gestures have been mentioned . 

Friday 24 April 2020

Accessibility : Tools

To ensure that accessibility is following all the guidelines ,   there are various tools which can be used by developer , designers and testers .

Here the most common tools are listed :

  • Accessibility  Scanner
  • Axe
  • Accessibility Suite
  • Manual Testing(For test to speech)
  • Attest
  • Asure
  • Accessibility  Lint
  • Contrast Checker

Accessibility Scanner :

This is the scanner android application by Google , which checks that the whole screen is following the accessibility guidelines or not . It takes the screenshot , and then scan each and every widget of that screen . Developer & QA can test the application on basis of following points using this scanner : touch area , color contrast , illegal announcement  etc. 

It shows the suggestions for the screen , which can be fixed by developer to make that screen more accessible. After installing the application the service will add under  Settings -> Accessibility -> Downloaded Service or External Service . 

Whenever it is required to test the app with this tools , ON the toggle under Settings -> Accessibility -> Downloaded Service or External Service -> Accessibility Scanner , one blue icon will appear like : 


Axe

This is also same as the accessibility scanner application by Deque Systems . The functionality is same , it also takes screenshot and then scan all the widgets and provide suggestions. 
After installing the application the service will add under  Settings -> Accessibility -> Downloaded Service or External Service . 

Whenever it is required to test the app with this tools , ON the toggle under Settings -> Accessibility -> Downloaded Service or External Service -> Axe , one purple guy icon will appear like : 


Accessibility  Suite

This is the bundle of apps/tools which are required to test the accessibility , provided by Google. The services which are provided by : 

Accessibility Menu: menu to lock your phone, control volume and brightness, take screenshots, etc.
Select to Speak: Select items on your screen and hear them read aloud.
Switch Access:one or more switches or a keyboard to interact with android app
TalkBack screen reader:text to speech tool

After installing the application the services will add under  Settings -> Accessibility -> Downloaded Service or External Service . 


Manual Testing

To check the focus and the announcement + focus , manual testing is required . To test it , TALKBACK is needed to turn on , which is place under : Settings -> Accessibility -> Downloaded Service or External Service -> Talkback

In few devices talkback is installed already , but in Samsung devices, voice assistance is used for text to speech , in those devices Talkback should be installed from google play . As talkback is considered as the standard announcement tool for accessibility.


Attest  

This is the desktop application , which worked with axe application , it is also provided by Deque Systems . The axe android application connect locally with this desktop application , and shows the scanned result in attest desktop window . This application is used to generate the attest file , which is the brief description pass and fail result of any app screen .


Assure : 

It is, provided by Deque Systems is step-by-step manual accessibility testing and reporting tool that enable functional testers with minimal accessibility knowledge to create precise, comprehensive and consistent accessibility issue reports for developers.

Accessibility  Lint: Apart from manual testing one another way to apply the accessibility lint to error , when announcement is not added for ImageView :


Contrast Checker : 

There is also one more rule for accessibility i.e. background and foreground color contrast should be correct . There are many cases , where developers are unable to get the correct ratio of foreground and background colors. To check that color ratio is pass or fail , this website helps the developer. 


These are most widely used tools to ensure that accessibility is implemented correctly .


Accessibility : Guidelines & Laws


For Accessibility Guidelines , 

The internationally-recognized , Web Accessibility Guidelines (WCAG) , published by the World Wide Web Consortium (W3C) , are the most authoritative source for defining web accessibility. The W3C also published the Authoring Tool Accessibility Guidelines (ATAG) 2.0 , for applications and software that create web content.

There are small description of the guidelines :

Web Accessibility Guidelines (WCAG)

  • Perceivable
  • Operable
  • Understandable
  • Robust


Authoring Tool Accessibility Guidelines

The Authoring Tool Accessibility Guidelines (ATAG) 2.0 —published by the World Wide Web Consortium (W3C) — specify principles that web authoring tools (Dreamweaver, SharePoint, etc.) should follow in order to facilitate the creation of accessible web content. The guidelines mention the importance of prompting users to type in alt text for images, add labels to forms, and so on.

The guidelines are built around two focus areas:
  • Make the authoring tool user interface accessible
  • Support the production of accessible content

These guidelines are briefly described in mentioned website.

There are many international  laws for accessibility , which helps to implement the accessibility as per the country rules .  All the laws with the country name and various filters are mentioned here :
 
https://www.w3.org/WAI/policies/

Accessibility : Introduction


Accessibility , feature is not only related to mobile platform  , but related to web as well .

While designing and creating the application / games , we generally focus to a larger part of audience , and with that part we should not forget that audience who may have some sort of disabilities . According to the WHO (World Health  Organisation) 15% of the world’s population, roughly one billion people, experience some form of disability affecting hearing, visual, cognitive, and motor functions. This can impact the way these users interact with technology, and it’s important to us at Google Play and Android that the apps/games should be usable by these audience as well.

Mobile Accessibility can be used by following type of users like:


  • Users, having permanent disability
  • Users, having temporary disability
  • Old aged people


There are many guidelines 📝, tools ⚙️ , features ✅which are available at Google Play which are used to provide the facility to make the application accessible to every user.

In accessibility , there are many features like : text to speech , gesture navigation , directional pad navigation , Braille display, Screen Magnifier which can be used to ease the users experience having some type of disability .


Thursday 23 April 2020

Kotlin : lateinit keyword vs lazy delegation (Post 21)

Hi ,

Here is my last topic of this Kotlin Basic Series . In this post I will talk about lateinit keyword & lazy delegation

lateinit keyword : 

It is used at the time of variable declaration , there are some rules :

  • It is used with mutable type of variables i.e. var
    • lateinit var name : String  ------  Allowed
    • lateinit val name : String  ------ Not Allowed
    • Allowed only non-nullable data types 
      • lateinit var name : String  ------  Allowed
      • lateinit val name : String?  ------ Not Allowed
    • The value must be assigned before it is used , other it throws UnintializedPropertyAccessException
    lateinit var name : String


    lazy Delegation :

    lazy is lazy initialization.

    lazy() is a function that takes a lambda and returns an instance of lazy which can serve as a delegate for implementing a lazy property:
    • The first call to get() executes the lambda passed to lazy() and remembers the result, subsequent calls to get() simply return the remembered result.
    • It is thread safe , it is initialized in thread where it is used for the first time , other threads used the same value remembered result which is stored in cache . 
    • It can be used with var & val both
    • It can be used with nullable & non-nullable values both 

    public class Example{
      val name: String by lazy { "Android" }
    }

    So that's it  for this post and for this series as well . I tried to explore and cover all the basic topics of Kotlin here, and with the help of these topics one can understand and develop android applications in Kotlin as well .

    In next post , I will explore a very interesting & essential topic i.e. Accessibility , till then Happy Coding 😀😀


    Kotlin : Null Safety Operators (Post 20)

    Hi ,

    I am here again to share another important topic of Kotlin , which is  null safety . In Kotlin , it is defined to avoid NullPointerException .
    There are following types of Null Safe Operators which can be used in our code to avoid NPE :


    • Safe Call (?.)
    • Safe Call with let ( ?.let)  
    • Elvis Operator (?:)
    • Non-null Assertion Operator (!!)

    Safe Call (?.) 


    It can be used when null value will not affect the programming flow . 
    Variable will return the value if not null else return null value. 

    var name : String? = null
    var name2 : String = "Hello"
            
    println("Length of NAME:"+ name?.length) //using safe call operator for nullable
    println("Length of NAME2:"+ name2.length)
    

    Output :


    Length of NAME:null
    Length of NAME2:5
    

    Here we can see that Name2 length is 5 , but name is having null value so length is also returning null.

    ======================================================================

    Safe Call with let ( ?.let)  

    Executes the let block only when , if the variable value is NOT NULL

    var name : String? = null
    var name2 : String = "Hello"
    
    name?.let {  println("Length of NAME:"+ name?.length) }
    
    name2.let {   println("Length of NAME2:"+ name2.length) }
    

    Output :


    Length of NAME2:5
    

    Since name is having null value so for that let block will not execute , so it will not print the statement , only name2 , let statement will execute and show the output.

    ========================================================================

    The Elvis Operator 

    It is represented by a question mark followed by a colon: ?: and it can be used with this syntax:
    first operand ?: second operand
    If first operand isn't null, then it will be returned. If it is null, then the second operand will be returned. This can be used to guarantee that an expression won't return a null value, as you'll provide a non-nullable value if the provided value is null.

    var name: String? = null
            
    val length = name?.length ?: -1
    println("Length of NAME: " + length)
    

    Output :


    Length of NAME: -1
    

    Here value of name is null so last statement is executed !

    ========================================================================

    Non-null Assertion Operator(!!) 

    This can be used when it is sure that variable value must not be NULL , it will throw NullPointerException , when variable is found Null .

    var name : String? = null
    var name2 : String = "Hello"
    
    println("Length of NAME2:"+ name2!!.length)
    println("Length of NAME:"+ name!!.length) //this will throw NPE


    Output :

    Length of NAME2:5
    
    Unable to start activity ComponentInfo: kotlin.KotlinNullPointerException
    

    As operator explains that throw NPE in case variable will contain null value , so when getting the length of name variable , which is having null value , it is throwing NullPointerException.

    So this is the basic practice of how Null Safety has been handled in Kotlin . I will share another post in this series very soon , till then Happy Coding 😀😀


    Kotlin : filter & map (Post 19)

    Hello All,

    Today I am going to share 2 another important operations that are "filter" & "map" ,

    Filter : This is used to apply a condition , on collections elements and get the resultant collections data , then there "filter" is used.

    Map : This is used to transform all the elements of collections data

     override fun onCreate(savedInstanceState: Bundle?) {
            super.onCreate(savedInstanceState)
            setContentView(R.layout.activity_main)
           
            var myList =  mutableListOf<Int>(34 , 6 , 29 , 15 , 65 , 9 , 12 , 42)
            var myEvenList = myList.filter { it%2 == 0 }
            for(num in myEvenList){
                println(num)
            }
             println("Double list : ")
    
            var myDoubleList = myEvenList.map { it*2 }
            for(num in myDoubleList){
                println(num)
            }
        }
    

    Output :

    34
    6
    12
    42
    
    Double list : 
    68
    12
    24
    84
    

    Here , we can see that I have added the condition to get even number from the myList , which is returning myEvenList , then I applied the map condition for getting the double numbers of all the elements of myEvenList , which we are getting in myDoubleList .

    Now take one example of Employee Data class :


    override fun onCreate(savedInstanceState: Bundle?) {
            super.onCreate(savedInstanceState)
            setContentView(R.layout.activity_main)
         
            var myList = listOf<Employee>(
                Employee(101,"Alen"),
                Employee(102,"Harrey"),
                Employee(103,"John"),
                Employee(104,"Sam"),
                Employee(105,"Alice"))
            var nameList: List<String> = myList.map{it.empName}
    
            for(name in nameList){
                println(name)
            }
            println("Initial List : ")
            var initialList = nameList.filter{ person -> person.startsWith("A")}
            for(num in initialList){
                println(num)
            }
        }
        class Employee (var empId: Int, var empName: String) {
        }
    

    Output :
    Alen
    Harrey
    John
    Sam
    Alice
    
    Initial List : 
    Alen
    Alice


    Here I have used one list , which is containing the list of Employees ,
    then in nameList , all the names are fetched using map()
    then from nameList , all the names are fetched starting with 'A'  , returning the initialList .

    Hope this will help to understand these two important topics of Kotlin. Will share another interesting topic in my next post , till then Happy Coding 😀😀

    Advanced Kotlin Coroutines : Introduction

     Hi,  Today I am unwraping the topic in Kotin world i.e. Coroutine . If you want to get started with Kotlin coroutine and ease your daily de...