Hi All,
In my previous post , I have shared the introduction of Room DB . Now in this tutorial I have shared you one demo to insert , retrieve , update and delete operations.
Here I have taken one database , named Emp.db , and table name is employee . In this table we have following rows:
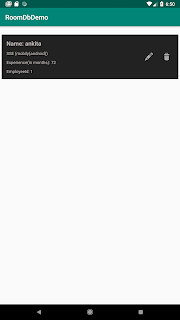
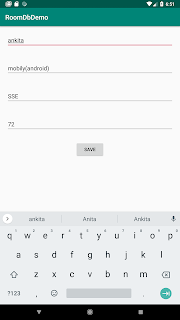
Let's take a look on following screenshots , for better understanding:

I am also sharing my source demo code .You can download this and run it by yourself:
Demo Source Code
I will create 3 buttons for insert , update and show the list of employees. Now let's take a look into coding part :
First add following dependencies in build.gradle(app) :
implementation 'androidx.room:room-runtime:2.0.0-alpha1'
annotationProcessor 'androidx.room:room-compiler:2.0.0-alpha1'
Now for resources I have added 3 layouts , one for the buttons , one for insert/update employee details and one for showing the list of stored employees, named :
emp_list_layout.xml
<?xml version="1.0" encoding="utf-8"?>
<RelativeLayout xmlns:android="http://schemas.android.com/apk/res/android"
android:layout_width="match_parent"
android:layout_height="match_parent" >
<ProgressBar
android:id="@+id/progressBar"
style="?android:attr/progressBarStyle"
android:layout_width="wrap_content"
android:layout_height="wrap_content"
android:layout_centerInParent="true"/>
<androidx.recyclerview.widget.RecyclerView
android:id="@+id/recycler"
android:layout_width="match_parent"
android:layout_height="match_parent"
android:layout_alignParentStart="true"
android:layout_below="@+id/btn_insert"
android:layout_marginTop="20dp" />
</RelativeLayout>
Now for java files I have created following main classes that are :
-> EmployeeRoomDb.java
import com.roomdbdemo.entity.EmpEntity;
import androidx.room.Database;
import androidx.room.RoomDatabase;
import androidx.room.migration.Migration;
import androidx.sqlite.db.SupportSQLiteDatabase;
@Database(entities = {EmpEntity.class},version = 2, exportSchema = false)
public abstract class EmployeeRoomDb extends RoomDatabase {
public static EmployeeRoomDb INSTANCE;
public abstract EmployeeDbDao employeeDbDao();
public static final Migration MIGRATION_1_2 = new Migration(1, 2) {
@Override
public void migrate(SupportSQLiteDatabase database) {
}
};
}
The above is abstract class defined, with the abstract method employeeDbDao() . This class is known as a database builder class.
btn_insert.setOnClickListener(new View.OnClickListener() {
@Override
public void onClick(View view) {
Intent intent = new Intent(getApplicationContext(), EmployeeDetailActivity.class);
intent.putExtra("comes_from","insert");
intent.putExtra("emp_id","");
startActivity(intent);
}
});
btn_update.setOnClickListener(new View.OnClickListener() {
@Override
public void onClick(View view) {
Utils utils = new Utils();
utils.showEditDialog(MainActivity.this);
}
});
btn_show.setOnClickListener(new View.OnClickListener() {
@Override
public void onClick(View view) {
Intent intent = new Intent(getApplicationContext(), EmployeeListActivity.class);
startActivity(intent);
}
});
I have used same class for inserting the employee detail and updating the employee detail i.e. EmployeeDetailActivity.class
public void showEditDialog(final Activity activity) {
AlertDialog.Builder alert = new AlertDialog.Builder(activity, R.style.AppTheme);
final EditText edittext = new EditText(activity);
edittext.setInputType(InputType.TYPE_CLASS_NUMBER | InputType.TYPE_NUMBER_FLAG_SIGNED);
edittext.setSingleLine(true);
alert.setMessage("Enter Employee Id , you want to update!");
alert.setTitle("Update");
alert.setView(edittext);
alert.setPositiveButton("Enter", new DialogInterface.OnClickListener() {
public void onClick(DialogInterface dialog, int whichButton) {
if (!TextUtils.isEmpty(edittext.getText())) {
int emp_id = Integer.parseInt(edittext.getText().toString());
Intent intent = new Intent(activity, EmployeeDetailActivity.class);
intent.putExtra("comes_from", "update");
intent.putExtra("emp_id", emp_id);
activity.startActivity(intent);
}
This alert will show , when we click update button . It will ask user for employee-id , whose detail user wants to update.
public class EmployeeDetailActivity extends AppCompatActivity {
private EditText edttxtName, edttxtDepart, edttxtDesig, edttxtExp;
private Button btnSave;
private String comes_from ;
private int emp_id;
private ProgressBar progressBar;
private Preference preference;
private int empIdStored = 0, empIdForNew; //we will save it in shared preference , will increase by 1 everytime
@Override
protected void onCreate(@Nullable Bundle savedInstanceState) {
super.onCreate(savedInstanceState);
setContentView(R.layout.emp_detail_layout);
inItViews();
Intent in = getIntent();
comes_from = in.getStringExtra("comes_from");
emp_id = in.getIntExtra("emp_id",0);
if (comes_from.equalsIgnoreCase("update")){
new getEmployeeInfo(emp_id).execute();
}
btnSave.setOnClickListener(new View.OnClickListener() {
@Override
public void onClick(View view) {
if (comes_from.equalsIgnoreCase("insert")){
insertEmployeeDetail();
}
else if (comes_from.equalsIgnoreCase("update")){
updateEmployeeDetail(emp_id);
}
}
});
}
private void inItViews() {
preference = Preference.getInstance(this);
edttxtName = (EditText)findViewById(R.id.edttxt_name);
edttxtDepart = (EditText)findViewById(R.id.edttxt_dept);
edttxtDesig = (EditText)findViewById(R.id.edttxt_desig);
edttxtExp = (EditText)findViewById(R.id.edttxt_exp);
btnSave = (Button)findViewById(R.id.btn_save);
progressBar = (ProgressBar)findViewById(R.id.progressBar);
progressBar.setVisibility(View.GONE);
}
private void updateEmployeeDetail(int emp_id) {
// fetch & insert the emp detail
if(!(TextUtils.isEmpty(edttxtName.getText()))&&
!(TextUtils.isEmpty(edttxtDepart.getText()))&&
!(TextUtils.isEmpty(edttxtDesig.getText()))&&
!(TextUtils.isEmpty(edttxtExp.getText()))){
// insert in db
EmpEntity empEntity = new EmpEntity(emp_id,edttxtName.getText().toString()
,edttxtDepart.getText().toString()
,edttxtDesig.getText().toString()
,edttxtExp.getText().toString());
new insertupdateEmpDetail(empEntity).execute();
}
else{
Toast.makeText(getApplicationContext(),"Please fill all the fields!",Toast.LENGTH_LONG).show();
}
}
private void insertEmployeeDetail() {
empIdStored = preference.getEmployeeId();
empIdForNew = empIdStored+1;
if(!(TextUtils.isEmpty(edttxtName.getText()))&&
!(TextUtils.isEmpty(edttxtDepart.getText()))&&
!(TextUtils.isEmpty(edttxtDesig.getText()))&&
!(TextUtils.isEmpty(edttxtExp.getText()))){
// insert in db
EmpEntity empEntity = new EmpEntity(empIdForNew,edttxtName.getText().toString()
,edttxtDepart.getText().toString()
,edttxtDesig.getText().toString()
,edttxtExp.getText().toString());
new insertupdateEmpDetail(empEntity).execute();
}
else{
Toast.makeText(getApplicationContext(),"Please fill all the fields!",Toast.LENGTH_LONG).show();
}
}
private class insertupdateEmpDetail extends AsyncTask<String, String, String> {
EmpEntity empEntity ;
public insertupdateEmpDetail(EmpEntity empEntity) {
this.empEntity = empEntity;
}
@Override
protected void onPreExecute() {
super.onPreExecute();
progressBar.setVisibility(View.VISIBLE);
}
@Override
protected String doInBackground(String... strings) {
if (comes_from.equalsIgnoreCase("insert")){
RoomDbDemoApplication.getInstance().getDb().employeeDbDao().insertEmpInfo(empEntity);
}
else{
RoomDbDemoApplication.getInstance().getDb().employeeDbDao().updateEmpInfo(empEntity);
}
return null;
}
@Override
protected void onPostExecute(String s) {
super.onPostExecute(s);
progressBar.setVisibility(View.GONE);
edttxtName.getText().clear();
edttxtDepart.getText().clear();
edttxtDesig.getText().clear();
edttxtExp.getText().clear();
if (comes_from.equalsIgnoreCase("insert")){
preference.setEmployeeId(empEntity.getEmp_id());
Toast.makeText(getApplicationContext(),"Employee record saved successfully!",Toast.LENGTH_LONG).show();
}
else{
Toast.makeText(getApplicationContext(),"Employee record updated successfully!",Toast.LENGTH_LONG).show();
}
finish();
}
}
private class getEmployeeInfo extends AsyncTask<String, String, String>{
int empId ;
EmpEntity empEntity;
public getEmployeeInfo(int emp_id) {
this.empId = emp_id;
}
@Override
protected void onPreExecute() {
super.onPreExecute();
progressBar.setVisibility(View.VISIBLE);
}
@Override
protected String doInBackground(String... strings) {
empEntity = RoomDbDemoApplication.getInstance().getDb().employeeDbDao().fetchEmpDetail(empId);
return null;
}
@Override
protected void onPostExecute(String s) {
super.onPostExecute(s);
progressBar.setVisibility(View.GONE);
if (empEntity!=null){
edttxtName.setText(empEntity.getName());
edttxtDepart.setText(empEntity.getDept());
edttxtDesig.setText(empEntity.getDesign());
edttxtExp.setText(empEntity.getExp());
}
else{
Toast.makeText(getApplicationContext(),"No Employee found with this employee-id!",Toast.LENGTH_LONG).show();
finish();
}
}
}
}
EmployeeListActivity.java
import android.os.AsyncTask;
import android.os.Bundle;
import android.view.View;
import android.widget.ProgressBar;
import android.widget.Toast;
import com.roomdbdemo.adapter.EmpListAdapter;
import com.roomdbdemo.entity.EmpEntity;
import com.roomdbdemo.helper.ClickListener;
import com.roomdbdemo.helper.RecyclerTouchListener;
import java.util.ArrayList;
import java.util.List;
import androidx.annotation.Nullable;
import androidx.appcompat.app.AppCompatActivity;
import androidx.recyclerview.widget.DefaultItemAnimator;
import androidx.recyclerview.widget.LinearLayoutManager;
import androidx.recyclerview.widget.RecyclerView;
public class EmployeeListActivity extends AppCompatActivity {
ArrayList<EmpEntity> empList = new ArrayList<>();
ProgressBar progressBar;
RecyclerView recyclerView;
@Override
protected void onCreate(@Nullable Bundle savedInstanceState) {
super.onCreate(savedInstanceState);
setContentView(R.layout.emp_list_layout);
progressBar = (ProgressBar)findViewById(R.id.progressBar);
progressBar.setVisibility(View.GONE);
recyclerView = (RecyclerView)findViewById(R.id.recycler);
recyclerView.setVisibility(View.GONE);
loadEmpList();
}
private void loadEmpList() {
//fetch emp list from DB
new LoadEmpListAsyncTask().execute();
}
private void showEmpList(List<EmpEntity> empEntities) {
EmpListAdapter mAdapter = new EmpListAdapter(EmployeeListActivity.this,empEntities);
recyclerView.setLayoutManager(new LinearLayoutManager(EmployeeListActivity.this));
recyclerView.setItemAnimator(new DefaultItemAnimator());
recyclerView.setAdapter(mAdapter);
}
private class LoadEmpListAsyncTask extends AsyncTask<String,String,List<EmpEntity>> {
@Override
protected void onPreExecute() {
super.onPreExecute();
progressBar.setVisibility(View.VISIBLE);
}
@Override
protected List<EmpEntity> doInBackground(String... strings) {
List<EmpEntity> empEntities = RoomDbDemoApplication.getInstance().getDb().employeeDbDao().showAll();
return empEntities;
}
@Override
protected void onPostExecute( List<EmpEntity> empEntities) {
super.onPostExecute(empEntities);
progressBar.setVisibility(View.GONE);
if (empEntities.size()>0){
recyclerView.setVisibility(View.VISIBLE);
showEmpList(empEntities);
}else{
Toast.makeText(getApplicationContext(), "No employee has been stored!!",Toast.LENGTH_LONG).show();
}
}
}
}And in Adapter class :
RoomDbDemoApplication.class:
import android.app.Application;
import com.roomdbdemo.db.EmployeeRoomDb;
import androidx.room.Room;
public class RoomDbDemoApplication extends Application {
public static RoomDbDemoApplication instance;
public EmployeeRoomDb myDatabase;
@Override
public void onCreate() {
super.onCreate();
instance = this;
myDatabase = Room.databaseBuilder(getApplicationContext(),
EmployeeRoomDb.class, "Emp.db")
.addMigrations(EmployeeRoomDb.MIGRATION_1_2)
.build();
}
public static RoomDbDemoApplication getInstance() {
return instance;
}
public EmployeeRoomDb getDb() {
return myDatabase;
}
}
That's it.However I have each and every necessary codes . But also I am attaching the source code demo link. So that it would be more understandable with running demo.
In my previous post , I have shared the introduction of Room DB . Now in this tutorial I have shared you one demo to insert , retrieve , update and delete operations.
Here I have taken one database , named Emp.db , and table name is employee . In this table we have following rows:
- emp_id (int & primary key)
- name (string)
- dept (string)
- designation (string)
- exp (string)
Let's take a look on following screenshots , for better understanding:


I am also sharing my source demo code .You can download this and run it by yourself:
Demo Source Code
I will create 3 buttons for insert , update and show the list of employees. Now let's take a look into coding part :
First add following dependencies in build.gradle(app) :
implementation 'androidx.room:room-runtime:2.0.0-alpha1'
annotationProcessor 'androidx.room:room-compiler:2.0.0-alpha1'
Now for resources I have added 3 layouts , one for the buttons , one for insert/update employee details and one for showing the list of stored employees, named :
- activity_main.xml (this is showing the various buttons)
- emp_detail_layout.xml (this is for insert/update employee details)
- emp_list_layout.xml (this is for insert/update employee details)
- emp_item_layout.xml (this is to design the row of list )
activity_main.xml
<?xml version="1.0" encoding="utf-8"?>
<RelativeLayout xmlns:android="http://schemas.android.com/apk/res/android"
xmlns:app="http://schemas.android.com/apk/res-auto"
xmlns:tools="http://schemas.android.com/tools"
android:layout_width="match_parent"
android:layout_height="match_parent"
tools:context=".MainActivity">
<Button
android:id="@+id/btn_insert"
android:layout_width="wrap_content"
android:layout_height="wrap_content"
android:layout_alignParentStart="true"
android:layout_alignParentTop="true"
android:layout_margin="10dp"
android:text="Insert Emp Detail" />
<Button
android:id="@+id/btn_update"
android:layout_width="wrap_content"
android:layout_height="wrap_content"
android:layout_below="@+id/btn_insert"
android:layout_alignParentLeft="true"
android:layout_margin="10dp"
android:text="Update Emp Detail" />
<Button
android:id="@+id/btn_show"
android:layout_width="wrap_content"
android:layout_height="wrap_content"
android:layout_below="@+id/btn_update"
android:layout_alignParentLeft="true"
android:layout_margin="10dp"
android:text="Show Emp List" />
</RelativeLayout>
emp_detail_layout.xml
<?xml version="1.0" encoding="utf-8"?>
<RelativeLayout xmlns:android="http://schemas.android.com/apk/res/android"
android:layout_width="match_parent"
android:layout_height="match_parent" >
<LinearLayout
android:orientation="vertical" android:layout_width="match_parent"
android:layout_height="match_parent">
<EditText
android:id="@+id/edttxt_name"
android:layout_width="match_parent"
android:layout_height="wrap_content"
android:ems="10"
android:layout_margin="20dp"
android:inputType="textPersonName"
android:hint="Name" />
<EditText
android:id="@+id/edttxt_dept"
android:layout_width="match_parent"
android:layout_height="wrap_content"
android:ems="10"
android:inputType="textPersonName"
android:layout_margin="20dp"
android:hint="Department" />
<EditText
android:id="@+id/edttxt_desig"
android:layout_width="match_parent"
android:layout_height="wrap_content"
android:ems="10"
android:layout_margin="20dp"
android:inputType="textPersonName"
android:hint="Designation" />
<EditText
android:id="@+id/edttxt_exp"
android:layout_width="match_parent"
android:layout_height="wrap_content"
android:ems="10"
android:inputType="number"
android:layout_margin="20dp"
android:hint="Experience(in months)" />
<Button
android:id="@+id/btn_save"
android:layout_width="wrap_content"
android:layout_height="wrap_content"
android:layout_margin="10dp"
android:layout_gravity="center_horizontal"
android:text="Save" />
</LinearLayout>
<ProgressBar
android:id="@+id/progressBar"
style="?android:attr/progressBarStyle"
android:layout_width="wrap_content"
android:layout_height="wrap_content"
android:layout_centerInParent="true"/>
</RelativeLayout>
emp_item_layout.xml
<?xml version="1.0" encoding="utf-8"?>
<RelativeLayout xmlns:android="http://schemas.android.com/apk/res/android"
xmlns:app="http://schemas.android.com/apk/res-auto"
android:orientation="vertical" android:layout_width="match_parent"
android:layout_height="wrap_content"
android:padding="10dp"
android:layout_margin="5dp"
android:background="#232222">
<TextView
android:id="@+id/textView"
android:layout_width="wrap_content"
android:layout_height="wrap_content"
android:layout_alignParentStart="true"
android:layout_alignParentTop="true"
android:layout_margin="5dp"
android:textSize="18sp"
android:textStyle="bold"
android:textColor="#b7afaf"
android:text="TextView" />
<TextView
android:id="@+id/textView2"
android:layout_width="wrap_content"
android:layout_height="wrap_content"
android:layout_below="@+id/textView"
android:layout_margin="5dp"
android:textSize="13sp"
android:textColor="#b7afaf"
android:text="TextView" />
<TextView
android:id="@+id/textView3"
android:layout_width="wrap_content"
android:layout_height="wrap_content"
android:layout_below="@+id/textView2"
android:layout_margin="5dp"
android:textSize="13sp"
android:textColor="#b7afaf"
android:text="TextView" />
<TextView
android:id="@+id/textView4"
android:layout_width="wrap_content"
android:layout_height="wrap_content"
android:layout_below="@+id/textView3"
android:layout_margin="5dp"
android:textSize="13sp"
android:textColor="#b7afaf"
android:text="TextView" />
<ImageView
android:id="@+id/imageView2"
android:layout_width="wrap_content"
android:layout_height="wrap_content"
android:layout_alignParentRight="true"
android:layout_centerVertical="true"
android:layout_marginEnd="5dp"
android:padding="5dp"
app:srcCompat="@android:drawable/ic_menu_delete" />
<ImageView
android:id="@+id/imageView3"
android:layout_width="wrap_content"
android:layout_height="wrap_content"
android:layout_toLeftOf="@+id/imageView2"
android:layout_centerVertical="true"
android:layout_marginEnd="12dp"
android:padding="5dp"
app:srcCompat="@android:drawable/ic_menu_edit" />
</RelativeLayout>
emp_list_layout.xml
<?xml version="1.0" encoding="utf-8"?>
<RelativeLayout xmlns:android="http://schemas.android.com/apk/res/android"
android:layout_width="match_parent"
android:layout_height="match_parent" >
<ProgressBar
android:id="@+id/progressBar"
style="?android:attr/progressBarStyle"
android:layout_width="wrap_content"
android:layout_height="wrap_content"
android:layout_centerInParent="true"/>
<androidx.recyclerview.widget.RecyclerView
android:id="@+id/recycler"
android:layout_width="match_parent"
android:layout_height="match_parent"
android:layout_alignParentStart="true"
android:layout_below="@+id/btn_insert"
android:layout_marginTop="20dp" />
</RelativeLayout>
Now for java files I have created following main classes that are :
- RoomDbDemoApplication.java (This is application class)
- MainActivity.java (This is activity for showing buttons)
- EmployeeDetailActivity.java (This is to insert/update the employee detail)
- EmployeeListActivity.java (This is to list the employee details)
Apart of this , I have created some more classes to define the components of Room DB, that are:
-> EmployeeDbDao.java
- EmployeeDbDao.java (This is the dao interface)
- EmployeeRoomDb.java (This is room db builder class)
- EmpEntity.java (This is the entity class used for mapping)
Also , I have created some more helper classes as well for ex: to save and get data from shared preference , to show alert dialog or to add click listener in recycler view etc.
First let's take a look on the coding part of the components of Room DB :
-> EmpEntity.java :
import androidx.annotation.NonNull;
import androidx.room.ColumnInfo;
import androidx.room.Entity;
import androidx.room.PrimaryKey;
@Entity(tableName = "employee")
public class EmpEntity {
@PrimaryKey
@NonNull
@ColumnInfo(name = "emp_id")
int emp_id;
@ColumnInfo(name = "name")
String name;
@ColumnInfo(name = "dept")
String dept;
@ColumnInfo(name = "designation")
String design;
@ColumnInfo(name = "exp")
String exp;
public EmpEntity(@NonNull int emp_id, String name, String dept, String design, String exp) {
this.emp_id = emp_id;
this.name = name;
this.dept = dept;
this.design = design;
this.exp = exp;
}
@NonNull
public int getEmp_id() {
return emp_id;
}
public void setEmp_id(@NonNull int emp_id) {
this.emp_id = emp_id;
}
public String getName() {
return name;
}
public void setName(String name) {
this.name = name;
}
public String getDept() {
return dept;
}
public void setDept(String dept) {
this.dept = dept;
}
public String getDesign() {
return design;
}
public void setDesign(String design) {
this.design = design;
}
public String getExp() {
return exp;
}
public void setExp(String exp) {
this.exp = exp;
}
}
The above is the entity class , it is used to create mapping between Data Object and Database.
Annotation @ColumnInfo is used to define the column name , it must be same as the db table .
Annotation @Entity is used to define the table name .
Annotation @PrimaryKey is define here to show the primary key column.
import com.roomdbdemo.entity.EmpEntity;
import java.util.List;
import androidx.room.Dao;
import androidx.room.Delete;
import androidx.room.Insert;
import androidx.room.Query;
import androidx.room.Update;
@Dao
public interface EmployeeDbDao {
@Insert
void insertEmpInfo(EmpEntity myBooksEntity);
@Update
void updateEmpInfo(EmpEntity myBooksEntity);
@Delete
void deleteEmpInfo(EmpEntity myBooksEntity);
// with query
@Query("SELECT * FROM employee")
List<EmpEntity> showAll();
// with query
@Query("SELECT * FROM employee WHERE emp_id = :emp_id")
EmpEntity fetchEmpDetail(int emp_id);
}
This is the dao interface, it is used to write all the queries which is required . I have defined here insert , update , delete and some more queries. For basic operations that are insert , update , delete , it provides the annotations (as you can see in above code) , and if it is required to fetch data using specific query , then we have @Query (as you can see in above code) .
-> EmployeeRoomDb.java
import com.roomdbdemo.entity.EmpEntity;
import androidx.room.Database;
import androidx.room.RoomDatabase;
import androidx.room.migration.Migration;
import androidx.sqlite.db.SupportSQLiteDatabase;
@Database(entities = {EmpEntity.class},version = 2, exportSchema = false)
public abstract class EmployeeRoomDb extends RoomDatabase {
public static EmployeeRoomDb INSTANCE;
public abstract EmployeeDbDao employeeDbDao();
public static final Migration MIGRATION_1_2 = new Migration(1, 2) {
@Override
public void migrate(SupportSQLiteDatabase database) {
}
};
}
Now let's move to the activity classes code:
In MainActivity.class , I just defined the click listener for all buttons , so just showing that part of the class:
@Override
public void onClick(View view) {
Intent intent = new Intent(getApplicationContext(), EmployeeDetailActivity.class);
intent.putExtra("comes_from","insert");
intent.putExtra("emp_id","");
startActivity(intent);
}
});
btn_update.setOnClickListener(new View.OnClickListener() {
@Override
public void onClick(View view) {
Utils utils = new Utils();
utils.showEditDialog(MainActivity.this);
}
});
btn_show.setOnClickListener(new View.OnClickListener() {
@Override
public void onClick(View view) {
Intent intent = new Intent(getApplicationContext(), EmployeeListActivity.class);
startActivity(intent);
}
});
In Utils class , I have defined one alert dialog with edittext which is used to get the employee id value from the user , to update the detail of that user.
Alert dialog in Utils.class:
AlertDialog.Builder alert = new AlertDialog.Builder(activity, R.style.AppTheme);
final EditText edittext = new EditText(activity);
edittext.setInputType(InputType.TYPE_CLASS_NUMBER | InputType.TYPE_NUMBER_FLAG_SIGNED);
edittext.setSingleLine(true);
alert.setMessage("Enter Employee Id , you want to update!");
alert.setTitle("Update");
alert.setView(edittext);
alert.setPositiveButton("Enter", new DialogInterface.OnClickListener() {
public void onClick(DialogInterface dialog, int whichButton) {
if (!TextUtils.isEmpty(edittext.getText())) {
int emp_id = Integer.parseInt(edittext.getText().toString());
Intent intent = new Intent(activity, EmployeeDetailActivity.class);
intent.putExtra("comes_from", "update");
intent.putExtra("emp_id", emp_id);
activity.startActivity(intent);
}
}
});
alert.setNegativeButton("Exit", new DialogInterface.OnClickListener() {
public void onClick(DialogInterface dialog, int whichButton) {
dialog.dismiss();
}
});
alert.show();
}
});
alert.setNegativeButton("Exit", new DialogInterface.OnClickListener() {
public void onClick(DialogInterface dialog, int whichButton) {
dialog.dismiss();
}
});
alert.show();
}
Now please take a close look on EmployeeDetailActivity.class, as this class is used for insert and update both .
EmployeeDetailActivity.class:
public class EmployeeDetailActivity extends AppCompatActivity {
private EditText edttxtName, edttxtDepart, edttxtDesig, edttxtExp;
private Button btnSave;
private String comes_from ;
private int emp_id;
private ProgressBar progressBar;
private Preference preference;
private int empIdStored = 0, empIdForNew; //we will save it in shared preference , will increase by 1 everytime
@Override
protected void onCreate(@Nullable Bundle savedInstanceState) {
super.onCreate(savedInstanceState);
setContentView(R.layout.emp_detail_layout);
inItViews();
Intent in = getIntent();
comes_from = in.getStringExtra("comes_from");
emp_id = in.getIntExtra("emp_id",0);
if (comes_from.equalsIgnoreCase("update")){
new getEmployeeInfo(emp_id).execute();
}
btnSave.setOnClickListener(new View.OnClickListener() {
@Override
public void onClick(View view) {
if (comes_from.equalsIgnoreCase("insert")){
insertEmployeeDetail();
}
else if (comes_from.equalsIgnoreCase("update")){
updateEmployeeDetail(emp_id);
}
}
});
}
private void inItViews() {
preference = Preference.getInstance(this);
edttxtName = (EditText)findViewById(R.id.edttxt_name);
edttxtDepart = (EditText)findViewById(R.id.edttxt_dept);
edttxtDesig = (EditText)findViewById(R.id.edttxt_desig);
edttxtExp = (EditText)findViewById(R.id.edttxt_exp);
btnSave = (Button)findViewById(R.id.btn_save);
progressBar = (ProgressBar)findViewById(R.id.progressBar);
progressBar.setVisibility(View.GONE);
}
private void updateEmployeeDetail(int emp_id) {
// fetch & insert the emp detail
if(!(TextUtils.isEmpty(edttxtName.getText()))&&
!(TextUtils.isEmpty(edttxtDepart.getText()))&&
!(TextUtils.isEmpty(edttxtDesig.getText()))&&
!(TextUtils.isEmpty(edttxtExp.getText()))){
// insert in db
EmpEntity empEntity = new EmpEntity(emp_id,edttxtName.getText().toString()
,edttxtDepart.getText().toString()
,edttxtDesig.getText().toString()
,edttxtExp.getText().toString());
new insertupdateEmpDetail(empEntity).execute();
}
else{
Toast.makeText(getApplicationContext(),"Please fill all the fields!",Toast.LENGTH_LONG).show();
}
}
private void insertEmployeeDetail() {
empIdStored = preference.getEmployeeId();
empIdForNew = empIdStored+1;
if(!(TextUtils.isEmpty(edttxtName.getText()))&&
!(TextUtils.isEmpty(edttxtDepart.getText()))&&
!(TextUtils.isEmpty(edttxtDesig.getText()))&&
!(TextUtils.isEmpty(edttxtExp.getText()))){
// insert in db
EmpEntity empEntity = new EmpEntity(empIdForNew,edttxtName.getText().toString()
,edttxtDepart.getText().toString()
,edttxtDesig.getText().toString()
,edttxtExp.getText().toString());
new insertupdateEmpDetail(empEntity).execute();
}
else{
Toast.makeText(getApplicationContext(),"Please fill all the fields!",Toast.LENGTH_LONG).show();
}
}
private class insertupdateEmpDetail extends AsyncTask<String, String, String> {
EmpEntity empEntity ;
public insertupdateEmpDetail(EmpEntity empEntity) {
this.empEntity = empEntity;
}
@Override
protected void onPreExecute() {
super.onPreExecute();
progressBar.setVisibility(View.VISIBLE);
}
@Override
protected String doInBackground(String... strings) {
if (comes_from.equalsIgnoreCase("insert")){
RoomDbDemoApplication.getInstance().getDb().employeeDbDao().insertEmpInfo(empEntity);
}
else{
RoomDbDemoApplication.getInstance().getDb().employeeDbDao().updateEmpInfo(empEntity);
}
return null;
}
@Override
protected void onPostExecute(String s) {
super.onPostExecute(s);
progressBar.setVisibility(View.GONE);
edttxtName.getText().clear();
edttxtDepart.getText().clear();
edttxtDesig.getText().clear();
edttxtExp.getText().clear();
if (comes_from.equalsIgnoreCase("insert")){
preference.setEmployeeId(empEntity.getEmp_id());
Toast.makeText(getApplicationContext(),"Employee record saved successfully!",Toast.LENGTH_LONG).show();
}
else{
Toast.makeText(getApplicationContext(),"Employee record updated successfully!",Toast.LENGTH_LONG).show();
}
finish();
}
}
private class getEmployeeInfo extends AsyncTask<String, String, String>{
int empId ;
EmpEntity empEntity;
public getEmployeeInfo(int emp_id) {
this.empId = emp_id;
}
@Override
protected void onPreExecute() {
super.onPreExecute();
progressBar.setVisibility(View.VISIBLE);
}
@Override
protected String doInBackground(String... strings) {
empEntity = RoomDbDemoApplication.getInstance().getDb().employeeDbDao().fetchEmpDetail(empId);
return null;
}
@Override
protected void onPostExecute(String s) {
super.onPostExecute(s);
progressBar.setVisibility(View.GONE);
if (empEntity!=null){
edttxtName.setText(empEntity.getName());
edttxtDepart.setText(empEntity.getDept());
edttxtDesig.setText(empEntity.getDesign());
edttxtExp.setText(empEntity.getExp());
}
else{
Toast.makeText(getApplicationContext(),"No Employee found with this employee-id!",Toast.LENGTH_LONG).show();
finish();
}
}
}
}
Here I have used empIdForNew variable is used . This is to create the new employee id on every new insertion. Initially it is 1 after when new employee details has been inserted , it will saved in shared preference and in next time it is fetched and incremented by 1 , then used at the time second employee detail insertion.
Now below is code to show the list of Employee detail which are saved in database.
import android.os.Bundle;
import android.view.View;
import android.widget.ProgressBar;
import android.widget.Toast;
import com.roomdbdemo.adapter.EmpListAdapter;
import com.roomdbdemo.entity.EmpEntity;
import com.roomdbdemo.helper.ClickListener;
import com.roomdbdemo.helper.RecyclerTouchListener;
import java.util.ArrayList;
import java.util.List;
import androidx.annotation.Nullable;
import androidx.appcompat.app.AppCompatActivity;
import androidx.recyclerview.widget.DefaultItemAnimator;
import androidx.recyclerview.widget.LinearLayoutManager;
import androidx.recyclerview.widget.RecyclerView;
public class EmployeeListActivity extends AppCompatActivity {
ArrayList<EmpEntity> empList = new ArrayList<>();
ProgressBar progressBar;
RecyclerView recyclerView;
@Override
protected void onCreate(@Nullable Bundle savedInstanceState) {
super.onCreate(savedInstanceState);
setContentView(R.layout.emp_list_layout);
progressBar = (ProgressBar)findViewById(R.id.progressBar);
progressBar.setVisibility(View.GONE);
recyclerView = (RecyclerView)findViewById(R.id.recycler);
recyclerView.setVisibility(View.GONE);
loadEmpList();
}
private void loadEmpList() {
//fetch emp list from DB
new LoadEmpListAsyncTask().execute();
}
private void showEmpList(List<EmpEntity> empEntities) {
EmpListAdapter mAdapter = new EmpListAdapter(EmployeeListActivity.this,empEntities);
recyclerView.setLayoutManager(new LinearLayoutManager(EmployeeListActivity.this));
recyclerView.setItemAnimator(new DefaultItemAnimator());
recyclerView.setAdapter(mAdapter);
}
private class LoadEmpListAsyncTask extends AsyncTask<String,String,List<EmpEntity>> {
@Override
protected void onPreExecute() {
super.onPreExecute();
progressBar.setVisibility(View.VISIBLE);
}
@Override
protected List<EmpEntity> doInBackground(String... strings) {
List<EmpEntity> empEntities = RoomDbDemoApplication.getInstance().getDb().employeeDbDao().showAll();
return empEntities;
}
@Override
protected void onPostExecute( List<EmpEntity> empEntities) {
super.onPostExecute(empEntities);
progressBar.setVisibility(View.GONE);
if (empEntities.size()>0){
recyclerView.setVisibility(View.VISIBLE);
showEmpList(empEntities);
}else{
Toast.makeText(getApplicationContext(), "No employee has been stored!!",Toast.LENGTH_LONG).show();
}
}
}
}And in Adapter class :
EmpListAdapter.class:
import android.app.Activity;
import android.content.DialogInterface;
import android.content.Intent;
import android.os.AsyncTask;
import android.view.LayoutInflater;
import android.view.View;
import android.view.ViewGroup;
import android.widget.ImageView;
import android.widget.TextView;
import com.roomdbdemo.EmployeeDetailActivity;
import com.roomdbdemo.R;
import com.roomdbdemo.RoomDbDemoApplication;
import com.roomdbdemo.entity.EmpEntity;
import java.util.List;
import androidx.appcompat.app.AlertDialog;
import androidx.recyclerview.widget.RecyclerView;
public class EmpListAdapter extends RecyclerView.Adapter<EmpListAdapter.MyViewHolder>{
Activity activity;
List<EmpEntity> empList ;
public EmpListAdapter(Activity mActivity, List<EmpEntity> empList) {
this.activity = mActivity;
this.empList = empList;
}
@Override
public EmpListAdapter.MyViewHolder onCreateViewHolder(ViewGroup parent, int viewType) {
View itemView = LayoutInflater.from(parent.getContext())
.inflate(R.layout.emp_item_layout, parent, false);
return new EmpListAdapter.MyViewHolder(itemView);
}
@Override
public void onBindViewHolder(EmpListAdapter.MyViewHolder holder, int position) {
final EmpEntity empEntity = empList.get(position);
holder.textName.setText("Name: "+empEntity.getName() );
holder.textDesignation.setText(empEntity.getDesign()+" ("+empEntity.getDept()+") ");
holder.textExp.setText("Experience(in months): "+empEntity.getExp());
holder.textEmpId.setText( "EmployeeId: "+empEntity.getEmp_id());
holder.imageView.setOnClickListener(new View.OnClickListener() {
@Override
public void onClick(View view) {
//delete the employee record
showDeleteDialog(activity,empEntity);
}
});
holder.imageEdit.setOnClickListener(new View.OnClickListener() {
@Override
public void onClick(View view) {
//edit the employee record
Intent intent = new Intent(activity, EmployeeDetailActivity.class);
intent.putExtra("comes_from", "update");
intent.putExtra("emp_id", empEntity.getEmp_id());
activity.startActivity(intent);
activity.finish();
}
});
}
@Override
public int getItemCount() {
return empList.size();
}
class MyViewHolder extends RecyclerView.ViewHolder{
ImageView imageView, imageEdit;
TextView textName, textDesignation, textExp, textEmpId;
public MyViewHolder(View itemView) {
super(itemView);
imageView = (ImageView)itemView.findViewById(R.id.imageView2);
textName = (TextView)itemView.findViewById(R.id.textView);
textDesignation = (TextView)itemView.findViewById(R.id.textView2);
textExp = (TextView)itemView.findViewById(R.id.textView3);
textEmpId = (TextView)itemView.findViewById(R.id.textView4);
imageEdit = (ImageView)itemView.findViewById(R.id.imageView3);
}
}
private void showDeleteDialog(Activity activity, final EmpEntity empEntity) {
AlertDialog.Builder alert = new AlertDialog.Builder(activity, R.style.AppTheme);
alert.setMessage("Are you sure , to delete this employee record?");
alert.setTitle("Delete");
alert.setPositiveButton("Yes", new DialogInterface.OnClickListener() {
public void onClick(DialogInterface dialog, int whichButton) {
deleteEmployeeRecord(empEntity);
dialog.dismiss();
}
});
alert.setNegativeButton("No", new DialogInterface.OnClickListener() {
public void onClick(DialogInterface dialog, int whichButton) {
// what ever you want to do with No option.
dialog.dismiss();
}
});
alert.show();
}
private void deleteEmployeeRecord(EmpEntity empEntity) {
new deleteTask(empEntity).execute();
}
private class deleteTask extends AsyncTask<String,String,String> {
EmpEntity empEntity ;
public deleteTask(EmpEntity empEntity) {
this.empEntity = empEntity;
}
@Override
protected String doInBackground(String... strings) {
RoomDbDemoApplication.getInstance().getDb().employeeDbDao().deleteEmpInfo(empEntity);
return null;
}
@Override
protected void onPostExecute(String s) {
super.onPostExecute(s);
empList.remove(empEntity);
notifyDataSetChanged();
}
}
}
Here you can see the process for updationg and deleting the employee record from the list.
Now last but not least , the application class.
import com.roomdbdemo.db.EmployeeRoomDb;
import androidx.room.Room;
public class RoomDbDemoApplication extends Application {
public static RoomDbDemoApplication instance;
public EmployeeRoomDb myDatabase;
@Override
public void onCreate() {
super.onCreate();
instance = this;
myDatabase = Room.databaseBuilder(getApplicationContext(),
EmployeeRoomDb.class, "Emp.db")
.addMigrations(EmployeeRoomDb.MIGRATION_1_2)
.build();
}
public static RoomDbDemoApplication getInstance() {
return instance;
}
public EmployeeRoomDb getDb() {
return myDatabase;
}
}


